Maestra Clare de Estepa
![]()
Welcome
News
Guild Info
Embroidery
Gallery
Calendar
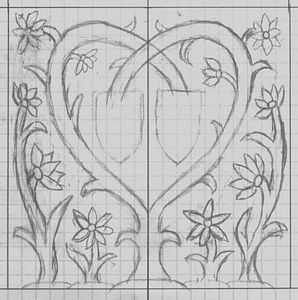 First, I design the pattern on paper.
I prefer to use graph paper because it makes it much easier to transfer the pattern to the ground material. The gridlines provide wonderful reference points when it is aligned with the ground.
After I design the pattern, I carefully outline everything with a heavy marker. I don't like regular magic markers because they require multiple tracings to widen the line sufficiently. I prefer to use a narrow tip Sharpie marker because it provides a nice solid line. The regular tip Sharpie markers are too wide for more delicate work.
For this project, I am making a sweetbag as a wedding present for two friends of mine. I designed the tree to match the flora styles that I have observed in Elizabethan embroidery. In the center of the tress, I am going to embroidery the coat of arms for the bride and the groom. While I knew that I could use the ground material itself as a stitch guideline for the pattern, I had serious doubts about my ability to draw those devices. Their devices were quite complex.
So, I cheated. I obtained electronic copies of their actual devices and decided to put my computer to work. After I finished designing the pattern, I scanned it into the computer. Then I pasted their devices into the scanned pattern. It allowed me to change the size of each device to the size required by the pattern. I was also able to position each device in the exact spot that I wanted it. It took a lot less time to complete the design with a computer graphics program than if I had tried to render the pattern by hand.
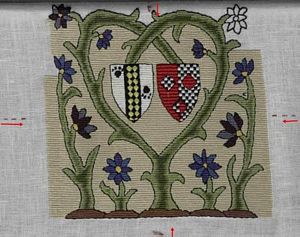 Second, I stitch guidelines along the ground of the fabric, I used red arrows to help point out the guidelines. At this point in my project, I was gradually removing the guidelines because they were no longer needed. However, I kept the edges as a precaution.
Sometimes just one guideline is needed along the horizontal. For example, when I am completing a pattern that has a border. I stitch along the outer boundary of the border. There is no need to completely finish this line because once it is in place the border is set. Now, I place the pattern on the ground being careful to line up the outer edges to determine the inner boundary of the border starts. I begin to stitch some of the border here as well.
If the design requires a precise placement for balance, such as a heraldic motif with the Elizabethan slipwork, I stitch a Y and X axis down the center of the ground. Those lines are then matched up with the X and Y axis that I drew on my paper. Since most Elizabethan slipwork outlines its motifs in black, I use a bright red to stitch the guidelines. The guidelines (indicated by the red arrows) are still present in this piece of embroidery. Using the guidelinees, I was able to insure that the pattern followed the ground material precisely. This is very important with tent stitch because it has a tendency to pull the embroidery to the side.
Third, I carefully pin the pattern to the ground. Make certain that your guidelines on both the pattern and the ground.
Fourth, I transfer the pattern to the ground. For the actual tracing itself, I prefer a water soluble blue quilting pen. The purple ones can leave a stain. The pink wax pencil can alter the texture of your ground cloth. Pencils and charcoals have smudging problems. In period, they would have used the charcoal or a permanent ink. So, I document that and explain why I used a modern substitute.
If it is a big project, I transfer the design by using a clear clipboard with a small halogen light placed under it. Empty film containers work great as corner supports to raise the clipboard.
If it is a small project, I pin the paper and the ground together. I then tape the paper to the window. Tracing is actually period and in some instances easier than pricking and pouncing. If at all possible, sunlight is better than the clipboard because the design is clearer. However, I like my arms attached to my body and not falling off at the shoulder. :-D
Last, quilting pens can fade quickly, especially in high humidity. I took one piece to an event in Alabama. Friday night the lines were clear and deep blue. Sunday morning they were light, faded, and almost non-existent at points. Because I was not yet using guidelines, I frantically tried to complete the outlining before the design disappeared completely. Unfortunately, I was not able to do this and lining up that re-tracing requires can be a nightmare. I made certain that I used guidelines in my next project. The guidelines made accurate ground/pattern alignment very easy. While I admit I hate the time that it takes to stitch a guideline, the improved results are very much worth it.
(Copyright June 2002 - 2004, Katherine Estep Stephenson)